Home Backup History
Every year I spend the holidays making sure that our home computers and items are backed up. I have a mixture of systems and media that need to be backed up. For the past few years I have used a combination of external drives and computers to create a robust backup and storage system. This year when people were out shopping for Black Friday I purchased a Lenovo Iomega IX2-DL NAS (Network Attached Storage) online. I originally was looking for a synology 2bay system but decided to look at alternatives.
Lenovo ix2-dl NAS First Impressions
I was able to find a new Lenovo Iomega IX2-DL that also came with 2 Segate 2TB ST2000DM001 drives.  I typically purchase things like this on NewEgg or TigerDirect but I was able to find a retailer on ebay with a new in box system and New drives.
Once the system arrived I immediately plugged in the drives. The case is sturdy and the front comes off by sliding the plastic face-plate up. One thing I did notice there was not much of any documentation available with the packaging.
TIP1: If you are looking for more documentation and information on this system use this url http://support.lenovoemc.com
After wiring the Lenovo Iomega IX2-DL into my Gigabit switch it was connected to the network I downloaded the Manager software, but after install it was unable to find the system on my network. I quickly used DHCP manager from my firewall and was able to find the IP address.
Once I had the IP address I was able to use the Management system login and begin to configure the ix2-dl. I quickly went about doing some configuration.
I changed the default password and username to one that was unique to my system. I updated the name of the NAS to “backup”. This way the family if they need anything can quickly just go to \\backup.
Initialize Disks ix2-dl
After I had changed a few settings I wanted to see if the management system would show me the drive configuration I wanted to use RAID 1 to have disk mirroring for security. To my surprise when I first when to the Drive Management section of the system showed a warning “Storage could not be initialized”. I attempted to remove the drives and re-power the system multiple times without any luck. I even attempted to use only one drive. After a bit of searching and finally finding the site above I discovered that the drives may need to be cleaned. Since these are new drives I had assumed the system would do this on power-up. I finally determined that I would need to use another system and clean the drives
Clean the Drive using Diskpart
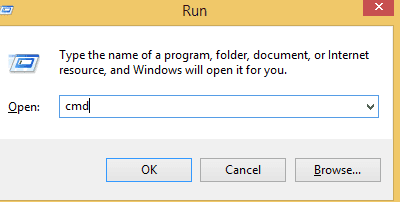
I pulled the drives and used a windows system to do a “clean”. Thankfully I have a SATA to USB connector that allows me to just connect these drives to any computer. Using windows 8.1, I opened a cmd
window (Dos Window)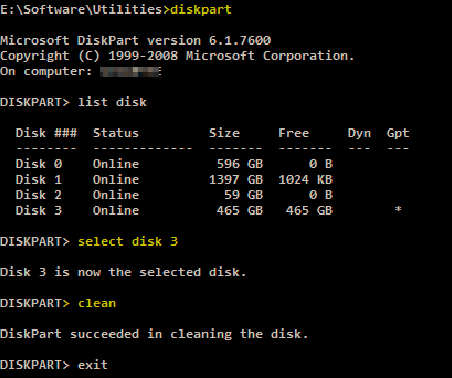
- Win+R
- Cmd
- Once in a command window run “Diskpart”
- inside diskpart run –
- list disk
- select disk 3(disk # – make sure to select the correct drive)
- clean (Warning: This will erase all contents on the disk)
- exit
I cleaned both Segate 2 TB drives in a matter of minutes making sure not to incorrectly clean my SSD drive. Next step was to mount the drives back into the Lenovo Iomega IX2-DL.
TIP2: Label the drives so when you do need to pull them out you can remember the proper bay.
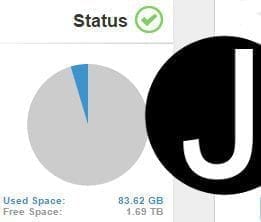
I used both marker and label maker to document the drives 1 and 2 and also the date put into service.  Once in the NAS I quickly used the management admin to verify they were working. It asked me a few questions and I was able to quickly setup RAID 1 mirroring. I now have 2TB (ok 1.8) of data storage available.
Admin Configuration
Once the disks were working properly I then moved on to the rest of the configuration. I opted to upgrade the firmware to the newest version. The administration web GUI was confusing at first. Once I updated to the new firmware 4.1.106.31982 (at the time of writing) the new UI was cleaner. Still a bit confusing to use. Once I understand the pattern I could quickly move around the admin. I installed a few add-ins and setup email and the personal cloud.
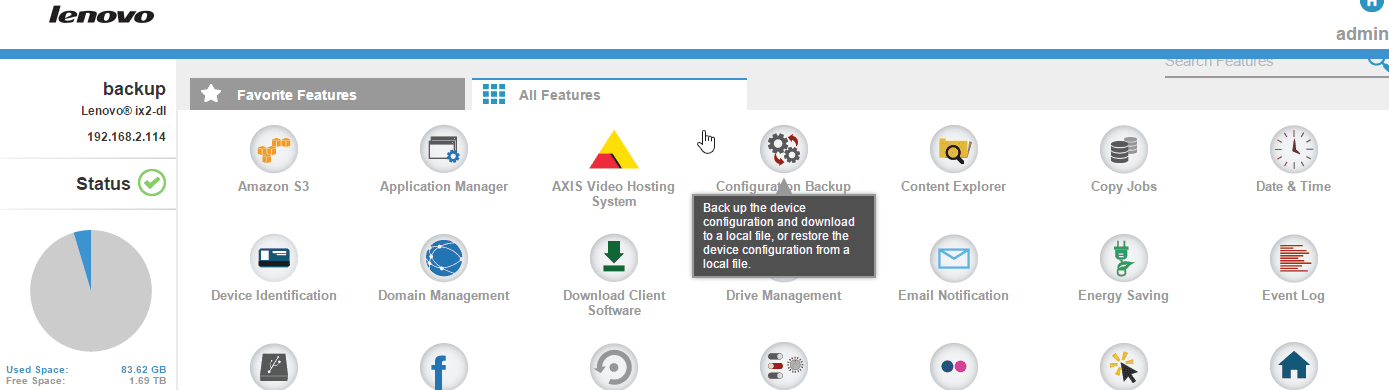
The admin console has a lot of applications and tools. I did a quick backup of the configuration and then set about testing the performance of the NAS and also the Lenovo Personal cloud. The setup of the personal cloud was cumbersome. I had to manually setup an account and then setup a few port forwarding rules on the firewall.

Final Impressions
Overall Lenovo Iomega IX2-DL system is working great. I have moved 80 Gigs of pictures and over 50 Gigs of movies to the system. The speed has been good in my opinion and performance speed has been good as well. I plan on using this for my Windows Media Center file storage. That should stress test the storage.
The only area of issues was having to clean the drives and the cumbersome admin. I would recommend others to purchase this cost effective NAS. I’ll continue using and will post in the future on how things are going. I don’t plan to fill up the Lenovo Iomega IX2-DL anytime soon, but backups start this week from all computers in the house.
DOCUMENTATION – http://www.lenovo.com/shop/emea/content/pdf/Storage/Product%20Release%20Information%20(PRI)/PRI_Lenovo_Iomega_ix2_2bay_EN.pdf
Hey Jim, thanks a lot for this review. I’m thinking about buying this just to have my own cloud, and equip it with two hard drives that I got out my laptops (I upgraded to SSD). Also, I would like to reproduce videos to my TV (LG Nanocell 55SM8050 IA 4K UHD HDR Smart TV) which I understand is possible.
I would be able to get it for around 30/40 Euros. Do you think this one might do the job?
Thanks again for the article.
Javier, it may work well. The only issue I see is that the laptop harddrives may not fit unless there is a caddy that will accommodate them.